
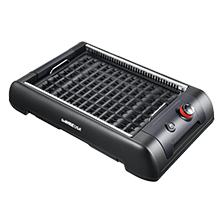


All dads can agree that summer is great for cooking up those summertime meals from grilled fruit, roasted vegetables, juicy burgers or even dessert skewers! What if you had a kitchen gadget that could do all of that and more?! Well, it’s about time you got our Smokeless Electric Grill! It’s small enough to fit on your kitchen counter and will still deliver those tasty outdoor grill results. It’s smokeless, so there’s no need to worry about smoking the whole house up to make your favorite meals. You simply pour in 2 cups of water into the collection pan beforehand and you’re set!
And this summer season is the PERFECT time to start grilling if you haven’t already! Make a five-course meal in minutes for all those family get togethers, summer bonfires, pool parties and more! And there are so many benefits to grilling, you’d be crazy not to! Grilling is a healthier AND faster choice. It will preserve all your nutrients, add a unique flavor that you won’t get from other forms of cooking, and you consume less fat. And let’s talk about the variety of things you can make with a grill. You will be grilling things you or your family didn’t even know were possible, like Barbecue Chicken Nachos, Grilled Blueberry French Toast, Brown Sugar Grilled Pineapple and Grilled Salad with Raspberry Poppy Seed Dressing!
Now, that we’ve showed you all there is to love about the Electric Grill, here are some helpful tips and a cooking chart to help you become a grilling master in no time!
Tips for Grilling
Always start with a clean grill. You don’t want yesterday’s dinner mixed in with today’s lunch. And when cleaning your grill is so easy and hassle free, there’s no reason not to keep it clean! You simply clean it with a warm, damp cloth and liquid soap. If you don’t like hand washing, then perfect, the grill and griddle plate, drip tray and collection tray are dishwasher safe.
Refrain from moving the food around. As many times as you want to flip your food over, try not to. The fewer times you flip something, the better. If your meat gets stuck to the grill, spray it with cooking spray beforehand and let your meat cook more – it will eventually unstick itself.
Don’t squeeze or flatten your meats. It’s always tempting to squeeze or flatten your meats to ensure they cook quicker. Doing this will hinder the grilling process and stop the fat from being created, which is where most of the juicy flavor is coming from.
Buy a meat thermometer. It can be hard sometimes to tell meat’s temperature just by looking at it or touching it. Using a meat thermometer will give you more confidence with any meat recipe you make on the grill! If you don’t have one, a general rule of thumb is if the meat is soft like the flesh between your index finger and thumb, it’s rare. If it’s soft like your cheek, it’s medium rare and if it’s firm like your forehead it’s well done.
Keep a spray bottle handy. Keeping a spray bottle full of water, oil or cooking spray next to your grill can be a life saver. Depending on the grill you have, having water next to you for those flames or flare-ups can help you dampen the flames. A spray bottle of oil or cooking spray can be helpful for oiling up your grill plates or tasty food. And let’s face it, it will make the grilling process go by much quicker.
Avoid putting cold foods straight on the grill. Instead let your meat come to room temperature on the counter for 30 minutes before grilling. This can help your food cook more evenly. The only time to cook with a chilled meat is if you’re grilling tuna and are trying to achieve a rare sear!
Under cook foods, just slightly. Carry over cooking is real! The food temperature will go up 5 degrees after leaving the grill. If you are leaving your food on the grill for a while, it is best to under cook it a little. Your food will continue to cook even after you shut the grill off, so plan ahead.
Let your meat rest! Allow your meat to sit undisturbed for 5-15 minutes after cooking it, so you can allow the juices to redistribute. This tip is important to achieve juicier results! The bigger the piece of meat, the longer you need to allow it to rest.
Don’t over-char to cook through meat with bones. We all love those slightly burnt grill marks, but no one likes all their meat covered in black char. If you have thicker meats with bones, cook them on high and them move them to a lower heat. This will let the meat cook through without overcooking the outside. You could also partially cook your meat in the oven 15-20 minutes before grilling.
Keep it simple when serving a crowd! When you are serving a crowd, it can be hard to keep track of everything you’re making and all the different appliances you’re using. Keep the options as simple as possible, so there are no errors or overcooking. And utilize our Electric Grill that can grill entrees and sides and meats, veggies, fruits, desserts and more!
|
Food Item |
Time (min) |
Temperature |
When It’s Done |
|
Fish |
12-15 |
155°F |
Opaque/Flaky |
|
Shrimp |
2-4 |
155°F |
Opaque & Red Edges |
|
Chicken Legs |
30-45 |
176°F |
Juice Runs Clear |
|
Chicken Breast |
20-25 |
176°F |
Juice Runs Clear |
|
Kebabs |
12-15 |
Your Preference |
Your Preference |
|
Steak |
3-9 |
140°F -165°F |
Your Preference |
|
Pork Chops |
20-25 |
160°F |
No Pink Meat |
|
Burgers |
10-15 |
160°F |
Your Preference |
|
Sausages |
15-25 |
160°F |
No Pink Meat |
|
Bacon |
1-2 |
N/A |
Crispy |
Brat Burgers with Beer Braised Caramelized Onions

This tasty recipe is perfect for breakfast, lunch or dinner! We selected pork for the patties, but any meat would go great with this one. We utilized our Pressure Cooker to sauté the onions, but feel free to use your stovetop! Any olive oil can be used to caramelize the onions, extra virgin olive oil is just what we had on hand. Switching to a gluten-free beer is a great option for those living a gluten-free or healthier lifestyle. We recommend using a sweeter beer, so you aren’t left with a bitter taste on the onions. Sweet onions will already give this a combination of a sweet and tangy taste. Other toppings that would go great on your burger to compliment the onions are tomatoes, lettuce, avocado or whatever else you desire! When cooking, keep in mind that your burgers could shrink up since the fat content in ground pork can vary. A helpful tip for getting great grill marks is to heat your grill over high heat and then turn it down to medium heat, just before adding the patties. We used medium high heat to make these burgers, so your time could vary depending on appliance used, temperature and thickness of patties! Make this meal even healthier and lettuce wrap it instead of using hamburger buns. Serve this burger with several tasty sides from baked beans, potato salad, potato chips, fresh fruit and more!
Ingredients:
1 lb. ground pork
¾ tsp coriander
¾ tsp ground sage
¾ tsp dry mustard
¾ tsp salt
¼ tsp dried rosemary
¼ tsp paprika
¼ tsp white pepper
¼ tsp nutmeg
1 tbsp olive oil
1 sweet onion, large
2 tsp Worcestershire sauce
12 oz. gluten-free beer
4 buns
Directions:
In your Pressure Cooker, heat the olive oil up using the Sauté setting, usually 3-4 minutes. Add the onions in and sauté until they are evenly caramelized. After 10 minutes, add in the beer, Worcestershire sauce and a dash of salt and bring to a boil. Then, turn on the Keep Warm setting and simmer until onions are tender and beer has nearly absorbed.
While the onions are simmering, preheat your grill on medium high heat. In a large mixing bowl, combine the pork and spices together. Form the mixture into 4 burger patties.
Spray the grill with cooking spray and place the burger patties on the grill plate. Cook the burgers for 15-20 minutes, or until cooked through.
Place the brat burgers onto the buns and top with the beer braised caramelized onions and serve!
Grilled Pork with Pear Salsa

Pork is the perfect meat for this recipe, because we wanted something lighter to compliment the pear salsa. We recommend marinating it over night to make sure your meat can soak up all those delicious flavors. You could grill the pork tenderloin whole instead of cutting it. Choose medium sized pears to ensure you have enough salsa to go around for all your meat. You can use fresh mint or dried mint, whichever one you desire. Keep in mind that if you use fresh mint to use 2 tablespoons and if you use dried mint, decrease it to 2 teaspoons. We opted for pear salsa to switch it up and we felt that kept in tone with summer. If you aren’t fond of pears, feel free to use a different salsa like mango or peach salsa. Or keep it classic and use some spicy pico de gallo! This summer recipe is large enough to serve 4-5 people, making it the perfect recipe for a summer barbecue.
Ingredients:
Pork:
¼ cup lime juice
2 tbsp olive oil
2 garlic cloves, minced
1 ½ tsp ground cumin
1 ½ tsp dried oregano
½ tsp pepper
2 lbs. pork tenderloin, cut into ¾ inch slices
Pear Salsa:
4 cups pears, chopped and peeled
1/3 cup red onion, chopped
2 tsp dried mint
2 tbsp lime juice
1 tbsp lime zest, grated
1 jalapeno pepper, seeded and chopped
1 tsp sugar
½ tsp pepper
Directions:
In a large bowl., combine the lime juice, olive oil, garlic, cumin, oregano and pepper. Add the pork to the large bowl and toss to coat. Refrigerate overnight.
After marinating, drain and discard the marinade.
Preheat your grill to medium high heat and spray cooking spray on your grill. Place the pork on the grill plate and grill for 10-15 minutes on each side, or until juices run clear.
While you are waiting for your pork to cook, combine all the salsa ingredients together in a mixing bowl. Serve pear salsa on top of pork and enjoy!
Grilled Pineapple with Lime Dip

This fruity dish is excellent as a delectable appetizer or luscious dessert! Fresh pineapple has so many health benefits, such as bone strength, digestion, immune system support and more! An easy way to cut a pineapple is to start by cutting the crown and stem off and slicing the skin off. Then, cut the pineapple in half lengthwise and then slice the rest into slices, chunks or strands! To give this recipe an extra sweet crunch, roll the pineapple wedges in coconut flakes before grilling. Or add the coconut flakes to your lime dip! Using brown sugar and honey sweetens up and compliments the tangy taste left from the lime juice and paprika. We sprinkled paprika on top to give it that extra zing, but feel free to omit that ingredient if you aren’t fond of it. We recommend refrigerating your dip until you’re ready to serve it to ensure it stays safe to eat and to maintain its flavor. Make a healthier and dairy free dip by utilizing dairy free yogurt and cream cheese! If it’s too much lime for you, go ahead and serve another dip, such as marshmallow, chocolate or raspberry lemon fruit dip!
Ingredients:
1 pineapple
¼ cup brown sugar, packed
3 tbsp honey
2 tbsp lime juice
paprika for garnish
Lime Dip:
3 oz. cream cheese, softened
¼ cup plain yogurt
2 tbsp honey
1 tbsp brown sugar
1 tbsp lime juice
1 tsp lime zest, grated
Directions:
Peel and core the pineapple and cut into eight wedges. Cut each wedge into two spears.
In a large resealable Ziploc bag, combine the brown sugar, honey and lime juice. Then, add the pineapple in and turn the bag to coat. Refrigerate for 1 hour.
In a small bowl, beat the cream cheese until it is smooth. Beat in the yogurt, honey, brown sugar, lime juice and lime zest until smooth. Cover and refrigerate until ready for serving.
Coat the grill rack with cooking spray and preheat your grill to high heat. Then, drain and discard the marinade and place the pineapple on the grill plate. Grill for 10 minutes on each side, or until golden brown.
Sprinkle paprika on top of the pineapple and serve with lime dip!
Chile Rellenos Grilled Chicken Tacos

Poblano peppers give off a combination of a smoky and spicy flavor that really enhance this recipe. Grilling them is an excellent idea if you have peppers that aren’t all the way ripe yet. Just be sure to oil your grill plate and peppers up to make certain that they do not get too burnt. You could leave the skins on after roasting the peppers but removing the skins will make them more flavorful! We used red wine vinegar because it’s not too acidic and is ideal for marinades to help brighten the flavors of the dish. Refrigerating your marinade over night will also help bring all those delicious flavors up to the surface. Make this a healthier option by choosing corn tortillas instead of flour ones! Don’t forget to utilize toothpicks to hold your tacos together if you’ve filled them up too tight. Some great side options to pair with this recipe are a Guacamole Quinoa Salad, Avocado Rice or even some Mexican Street Corn Dip!
Ingredients:
1/3 cup olive oil
1/3 cup lime juice
1/3 cup red wine vinegar
2 tsp sugar
2 tsp salt
2 tsp pepper
1 cup fresh cilantro, coarsely chopped
2 tbsp chipotle peppers in adobe sauce, finely chopped
2 lbs. boneless skinless chicken thighs
4 poblano peppers
1 tbsp olive oil
8 flour tortillas, 8 inches
2 cups Monterey Jack cheese, shredded
Directions:
In a small bowl, whisk together the first six ingredients until blended. Stir in the cilantro and chipotle peppers. Transfer 2/3 of the marinade to a large resealable plastic bag.
Add the chicken to the bag, seal the bag and turn it to coat. Refrigerate for 8 hours or overnight. Cover and refrigerate the remaining marinade for tossing with the grilled chicken.
Brush the poblano peppers with 1 tbsp of olive oil. Turn your grill to medium high heat and place your peppers on the grill plate. Grill them for 8-10 minutes, or until all sides are blistered and blackened. Then, place the peppers in a small bowl and let stand covered for 20 minutes.
Drain the chicken and discard the marinade in the bag. Place the chicken on the grill and grill for 5-10 minutes on each side, or until chicken reaches 165°F.
Then, peel off and discard the charred skins from the peppers. Cut the peppers lengthwise in half and carefully remove the stems and seeds. Cut the chicken into slices. Then, warm the reserved marinade up and add the chicken in, tossing to coat.
To assemble, place one pepper half in the center of each tortilla. Top with ½ cup chicken and ¼ cup of cheese. Fold the tortillas in half over filling. Place your taco on the grill and grill for 2-3 minutes on each side, or until heated through. Repeat the same steps for the remaining tacos.
Spicy Grilled Eggplant

This tasty dish goes well as a side or a full meal! You could pair it with pasta or meats, such as Grilled Lamb, Thai Green Curry or Tomato Penne Pasta. Using Cajun seasoning gives the eggplant that extra kick and makes this recipe the perfect replacement for your regular veggies. Switch it up and use a different seasoning, such as a home blend or chili powder by itself. We recommend utilizing olive oil on your grill plates and eggplant to ensure they do not burn or get stuck to the grill. Afterwards, use paper towels to blot up the moisture from the olive oil. Fancy up this dish and sprinkle chives on them at the end. Chives are a great substitute to using green onions or regular onions as they have a much milder taste. Go the extra mile and throw your eggplant slices in the air fryer really quick, if you want them a little crispier!
Ingredients:
2 small eggplants, cut into ½ inch slices
¼ cup olive oil
2 tbsp lime juice
3 tsp Cajun seasoning
Directions:
Brush olive oil onto the eggplant slices. Drizzle lime juice and sprinkle Cajun seasoning on them. Let them stand for 5 minutes.
Turn on your grill to medium high heat. Place your eggplant slices on the grill plate and grill them 5-6 minutes per side, or until tender.
Philly Cheese-steak

This classic sandwich will grill nicely leaving you with a moist and cheesy dish! Other ingredients you could stuff this sandwich with are mushrooms, caramelized onions or minced garlic! Or even switch this recipe up and make Philly Cheese-steak Nachos or Cheese Dip! Roast beef was ideal for this one, because it is a high-grade meat that is great for roasting and grilling, because of its tenderness. Using a tenderloin or rib-eye would be just as delicious too! Keep in mind the internal temperature of roast beef is 145°F – 150°F to ensure your meat is cooked to a safe temperature. We used Italian bread for this dish but go ahead and use hoagie rolls or ciabatta rolls! Feel free to use aluminum foil on the grill for an easier clean up. We utilized an Electric Grill to make this recipe but go ahead and use an Air Fryer or Oven, as well! Pair this sub with some crispy Sweet Potato Fries, Caesar Salad or Creamy Coleslaw!
Ingredients:
1 loaf of Italian bread
½ lb. roast beef, thinly sliced
1 white onion, thinly sliced
1 green bell pepper, thinly sliced
2 tsp garlic, minced
½ lb. provolone cheese, thinly sliced
olive oil
salt and pepper to taste
Directions:
Heat the griddle to medium-high heat and brush with olive oil. Split the bread and place it face down and toast for 2-3 minutes. Remove from the griddle and add more olive oil to the griddle if needed.
Add sliced bell peppers and onions and cook for 7 minutes, stirring occasionally. Add garlic, salt and pepper and continue to cook another minute. Push the mixture to the side of the griddle and add the meat to the empty space.
Cook meat for 2-3 minutes, continuously flipping and breaking the meat into smaller pieces. Mix meat and vegetables together and top with provolone cheese.
Once the cheese is melted, assemble sandwich and enjoy!
Now is the best time to invest in one of our Electric Grills for yourself! It is the season for grilling and whether you’re trying to live a healthier lifestyle or just make Sunday night dinner for the family, this will help you do just that. This grill is so simple and easy to use, you’ll be cooking things you only dreamed about. And the number of different recipes you can make in one of these is endless! Show up to any family event with the best grilled entree or side dish, they’ll wonder how you did it. If you’re eager to start grilling, then take advantage of our Father’s Day promotion and get $10 off your Electric Grill by simply using our discount code GWDAD10 upon checkout!
If you need more recipe ideas, enjoy our included recipe book with easy to follow steps and check out a grilled dessert staple of ours Strawberry Shortcake Skewers with Blueberry Glaze. It’s a sweet and delectable dessert for the whole family to enjoy!
If you still feel unsure, there are so many outlets out there to help you with tips, tricks and recipes! We also have a YouTube channel and other helpful blog posts to help you get more familiar with your GoWISE USA product and find useful tips and recipes.
We appreciate every one of our customers and hope you found this post helpful with getting more familiar with your GoWISE USA Smokeless Electric Grill. And don’t forget to share your experiences and creations with our products using the #GoWISEUSA on all of our social channels or join our GoWISE Creations community on Facebook.
A big thank you to the authors of the recipes we tested out. Check out the links below to take a look at the original recipes and tips on grilling.
https://www.tasteofhome.com/collection/5-star-grilling-recipes-youve-gotta-try/
https://www.tasteofhome.com/recipes/grilled-pork-with-pear-salsa/
https://www.tasteofhome.com/recipes/grilled-pineapple-with-lime-dip/
https://www.tasteofhome.com/recipes/chiles-rellenos-grilled-chicken-tacos/
https://www.tasteofhome.com/recipes/spicy-grilled-eggplant/
https://dontwastethecrumbs.com/2019/03/how-to-cut-a-pineapple/
https://www.foodnetwork.com/fn-dish/chefs/2016/06/top-10-tips-for-excellent-summer-grilling